Tutorials
Installation Guide: Setting Up AutoByteus
Follow these steps to install and configure AutoByteus for your development environment. You only need to perform these steps once during initial setup.
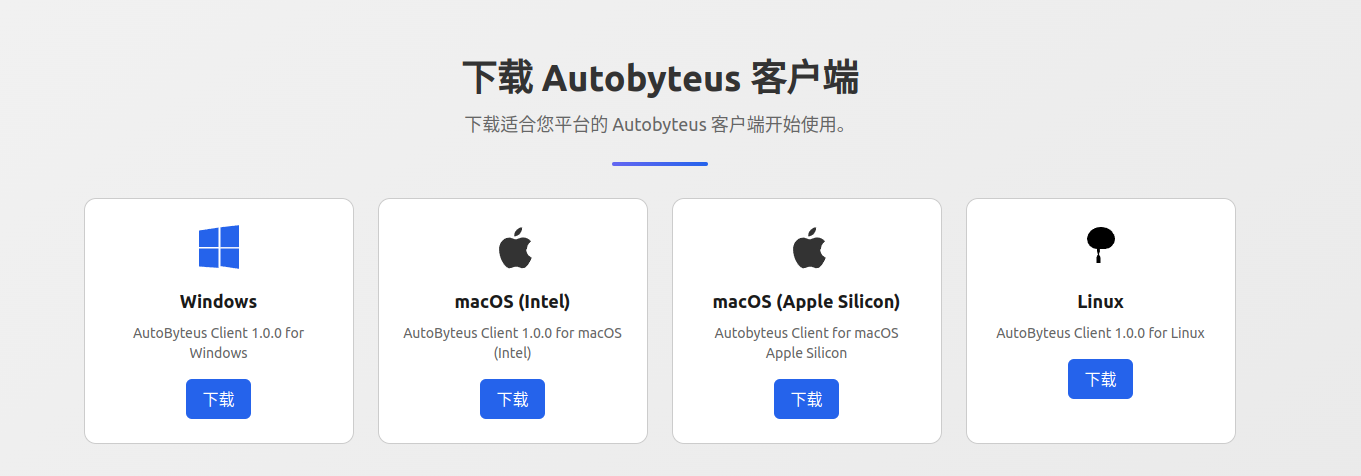
1 Download AutoByteus Client
First, download the AutoByteus client for your operating system:
- Visit the homepage at https://www.niuzhirui.tech/
Select the appropriate version for your operating system:
🪟Windows: Click the Windows download button🍎macOS (Intel): For Macs with Intel processors🍎macOS (Apple Silicon): For Macs with M1/M2/M3 processors🐧Linux: For Linux-based operating systems- Click the Download button to start the download
2 Install Docker
AutoByteus requires Docker to run the LLM server container:
- Visit the Docker website at https://www.docker.com/
- Download Docker Desktop for your operating system
- Follow the installation instructions for your platform
- After installation, start Docker Desktop
- Verify Docker is running by checking for the Docker icon in your system tray/menu bar
3 Install AutoByteus Client
Windows Installation
- Locate the downloaded .exe installer file
- Right-click and select "Run as administrator"
- Follow the installation wizard instructions
- Choose your installation location when prompted
- Complete the installation and launch AutoByteus
macOS Installation
- Locate the downloaded .dmg file
- Double-click to open the disk image
- Drag the AutoByteus application to your Applications folder
- Before the first launch, it's recommended to remove the quarantine attribute to prevent security warnings. Open the Terminal app and run: xattr -d com.apple.quarantine /Applications/AutoByteus.app
- Launch AutoByteus from your Terminal by running the following command. This is the recommended way to start the application. open /Applications/AutoByteus.app
Important Note:
Launching from the Terminal ensures that AutoByteus inherits your full shell environment variables. This is crucial for features like MCP server discovery and other command-line tool integrations to work correctly.
Linux Installation
- Open a terminal in the download location
- Make the installer executable: chmod +x ./autobyteus-installer.AppImage
- Run the installer: ./autobyteus-installer.AppImage
- Follow the installation prompts
- Launch AutoByteus from your applications menu or terminal
4 Run the LLM Server Container
The LLM server runs in a Docker container and provides AI capabilities to AutoByteus:
- Open a terminal or command prompt
- Run the appropriate command for your operating system to start the LLM server: For macOS or Linux:docker rm -f llm-server 2>/dev/null || true && docker pull autobyteus/llm-server:latest && docker run -d --name llm-server --cap-add SYS_ADMIN --security-opt seccomp=unconfined -p 5900:5900 -p 6080:6080 -p 51739:51739 -e DISPLAY=:99 --restart unless-stopped autobyteus/llm-server:latestFor Windows:powershell -Command "docker rm -f llm-server 2>&1 | Out-Null; docker rmi autobyteus/llm-server:latest 2>&1 | Out-Null; docker pull autobyteus/llm-server:latest; docker run -d --name llm-server --cap-add SYS_ADMIN --security-opt seccomp=unconfined -p 5900:5900 -p 6080:6080 -p 51739:51739 -e DISPLAY=:99 --restart unless-stopped autobyteus/llm-server:latest"
- Wait for the container to download and start (this may take a few minutes on first run)
- Verify the container is running with: docker ps
5 Configure AutoByteus Client
Now that both AutoByteus and the LLM server are running, you need to verify the configuration:
First Launch
- Launch the AutoByteus client
- The first launch may take some time as it initializes. Please be patient.
- Once loaded, you will see the welcome screen
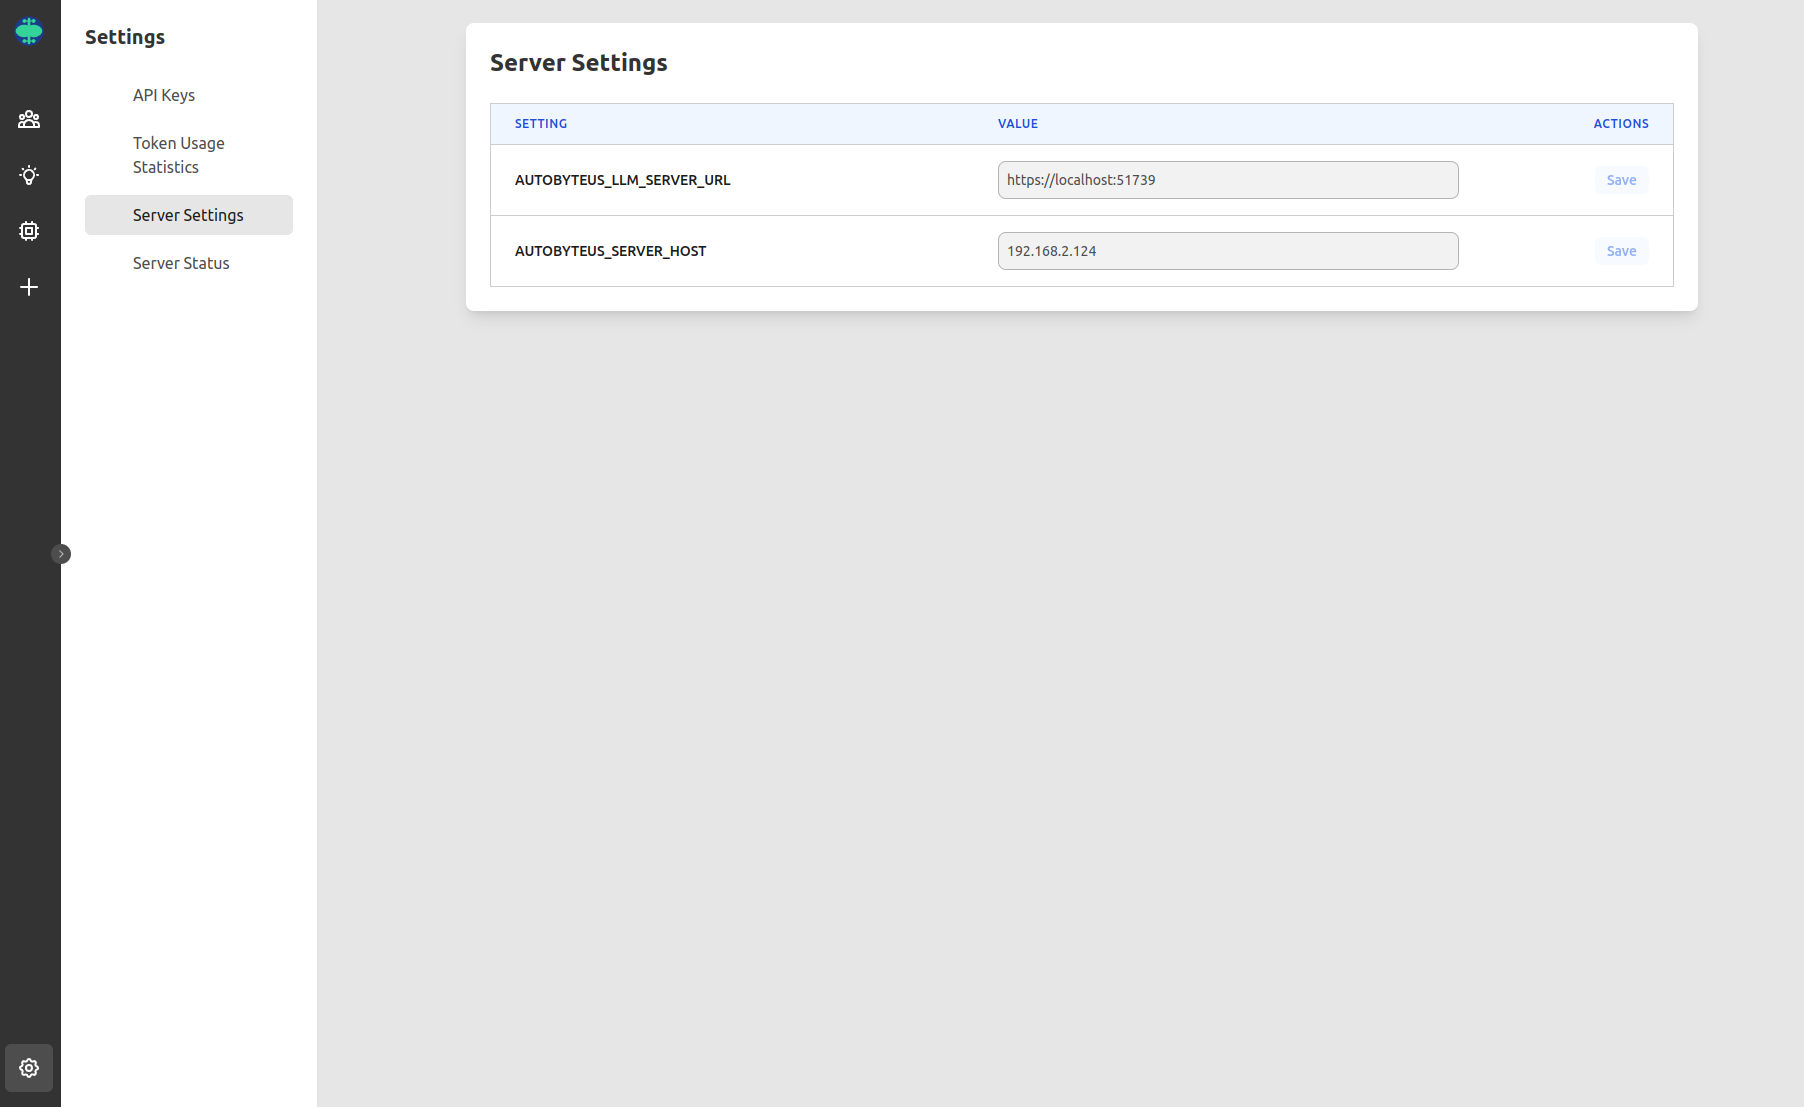
Server Settings
The server settings are automatically configured by the AutoByteus client. You can verify these settings if needed:
- Click the Settings icon in the sidebar (gear icon)
- Select "Server Settings" from the menu
- You will see two parameters that are automatically configured:
- AUTOBYTEUS_LLM_SERVER_URL: Typically set to https://localhost:51739
- AUTOBYTEUS_SERVER_HOST: Your local IP address (typically starts with 192.168.)
- You need to manually configure these additional parameters:
- IMPORTANT: Add the following parameter to synchronize prompts:AUTOBYTEUS_MARKETPLACE_HOST = https://api.niuzhirui.tech/
Without this setting, workflow steps will not have prompts and the application will not function correctly.
- OPTIONAL: If you want to synchronize Chinese prompts instead of English prompts, add:AUTOBYTEUS_PROMPT_SYNC_LANGUAGE = zh
By default, the system will synchronize English prompts if this parameter is not set.
- Enter the key and value into the appropriate fields and click "Save" for each parameter
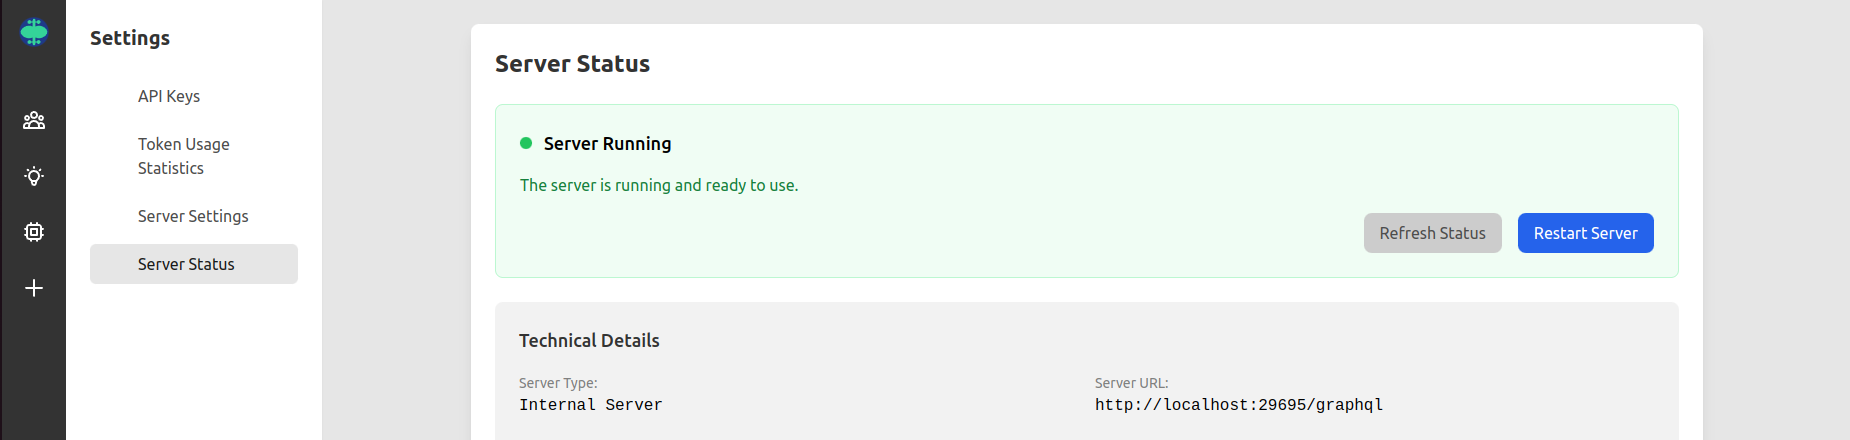
Check Server Status
- In the Settings menu, click "Server Status"
- Verify that the server shows as "Running"
- The internal Python server should automatically start with AutoByteus
6 Generate and Configure License Key
Your Niuzhirui account includes a license key that provides access to the service:
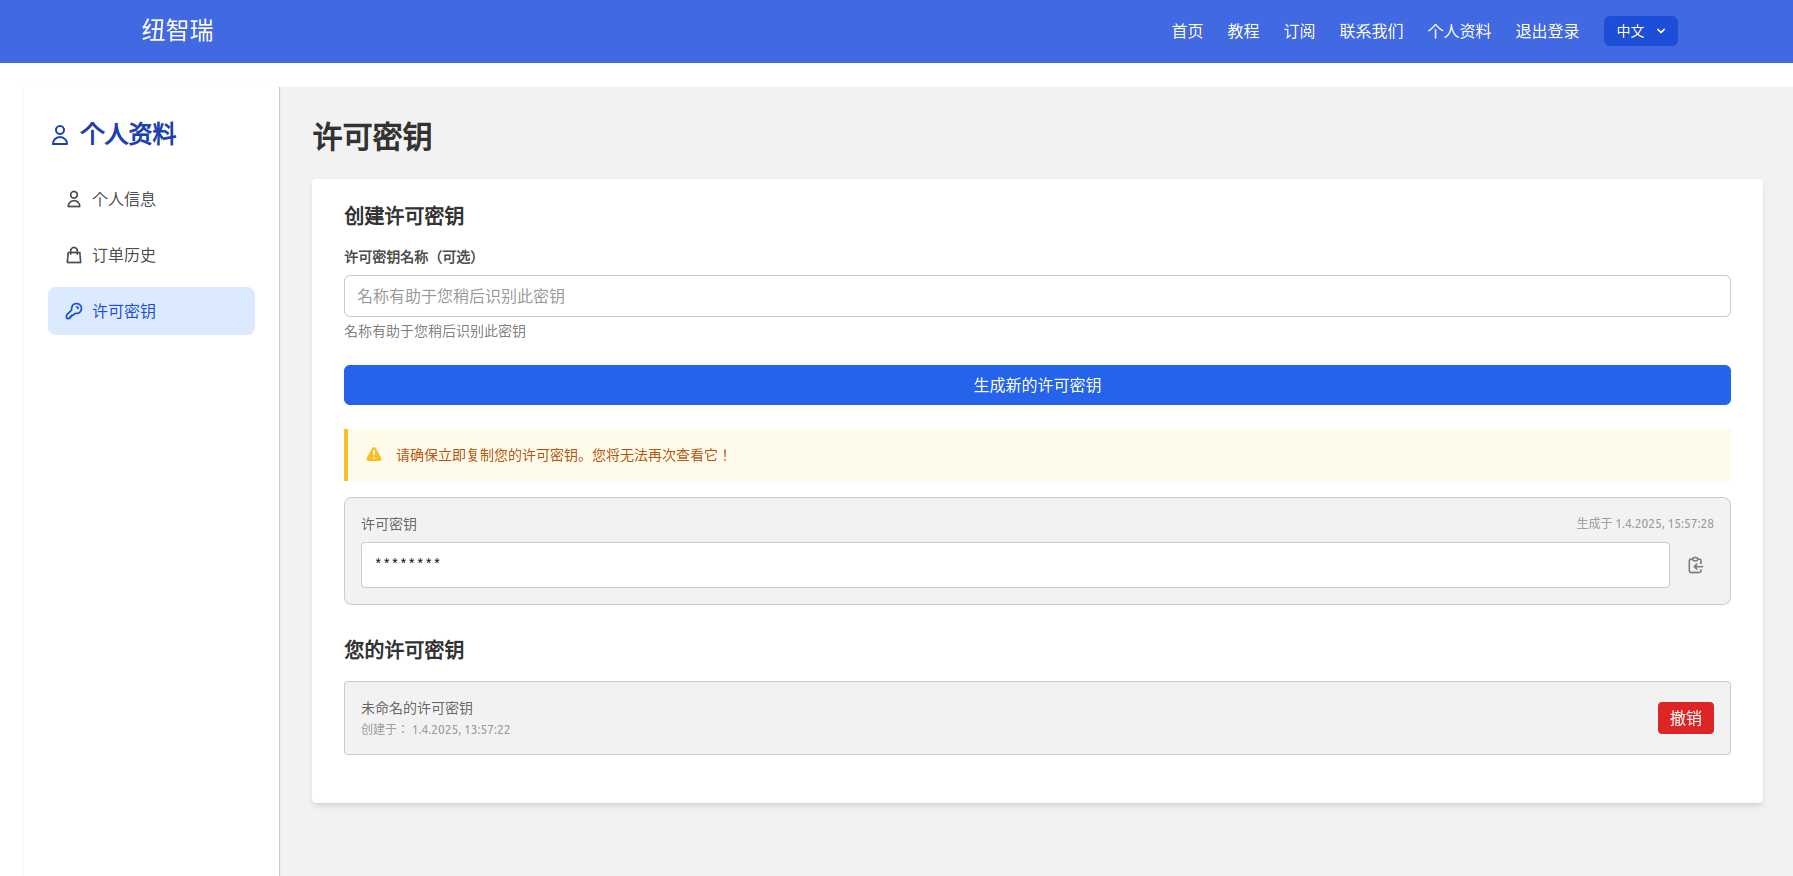
Generate License Key
- Log in to your Niuzhirui account at https://www.niuzhirui.tech/
- Navigate to your Profile page
- Click on "License Keys" in the sidebar
- Click "Generate New License Key"
- Copy the generated key immediately (it will only be shown once)
Configure License Key in AutoByteus
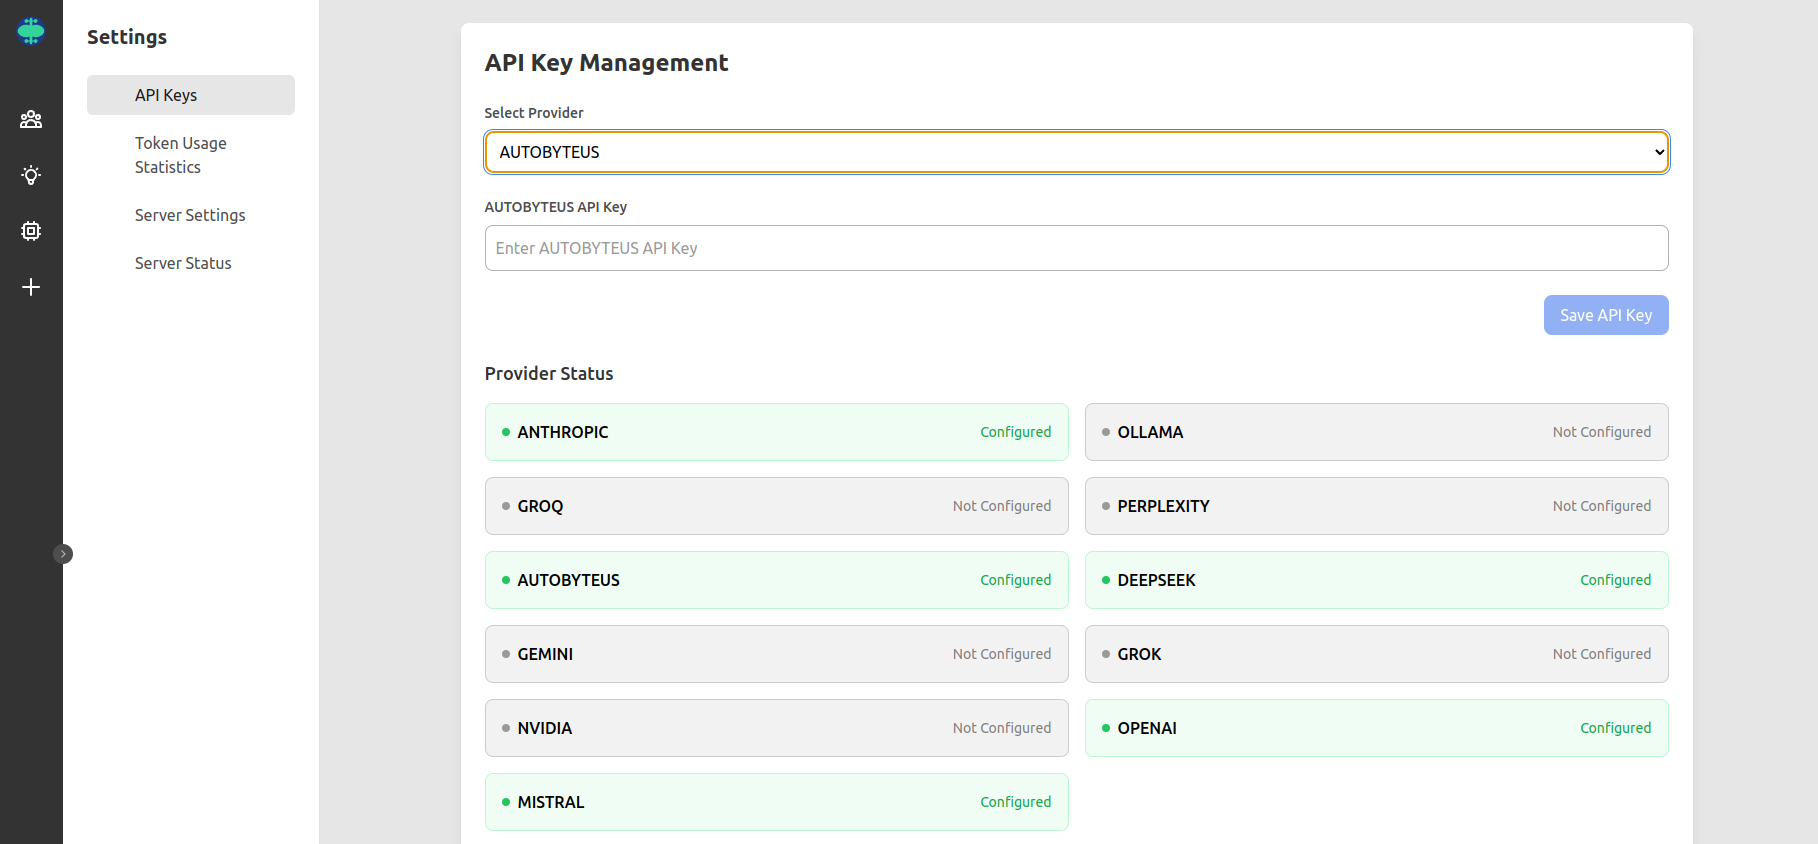
- In AutoByteus, go to Settings
- Select "API Keys" from the menu
- Select "AUTOBYTEUS" from the provider dropdown
- Paste your license key in the field
- Click "Save API Key"
- After saving, additional AI models should appear in the Provider Status section
- If no additional models appear, check if your Docker LLM server is running properly
Free Usage Allowance
Each registered user receives 10 free requests per week. For additional usage, you will need to purchase a subscription.
✅ Installation complete! Now proceed to the Workflow Guide to learn how to use AutoByteus.